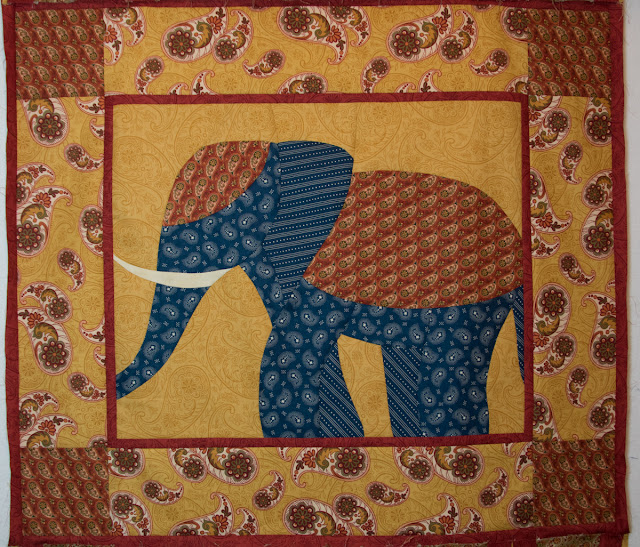
This is a story full of adventures and discoveries, errors and disappointments - it's the story of how I made the borders for my elephant block.
I had several cuts of the "Spice Trail" collection by Freedom Fabrics, which have really nice tasty colours, and I had in mind some kind of Indian carpet that they often depict on elephants' backs with arc like patterns in the border. I thought they would work nice for curve piecing. I started with a simple border with paisley patterned fabric:
Then I started making my arcs, and I had to modify my curve piecing process for mass production of identical blocks, which I'll talk about later. It must be said that with curved parts it's impossible to calculate in advance how much fabric you're going to need, you can only estimate ... you see already where this is going, don't you? Yes, I didn't have enough fabric for four borders. I also cut several pieces out of the wrong fabric, which depleted my stock.
So much so for the carpet, I decided to make it more vertical by adding another border:
Had I designed and planned it properly in advance, I would have pieced it in a different way. Then I decided to add a little bit of remaining patterned fabric and so I went from an 18'' by 22'' block to a 32'' by 47'' - all in a couple of days. What do you think of that? I think I have to stop here.
Now, some technical tips and tricks in case anybody is interested:
Mass Production Curve Piecing
The normal curve piecing process involves tracing pattern pieces around a freezer paper template, which makes it very precise and reliable, but it would be very time-consuming for a lot of repeating blocks, so I modified the process. I does require experience, but it greatly speeds things up.
- Trace the pattern pieces onto template plastic and draw a 1/4'' seam allowance around them, don't forget the matching marks - cut a narrow notch in the plastic for them, like they do in clothes making (at least I was taught to do so). I also discovered the templates need a couple of pieces of double-sided tape to prevent them from moving around on fabric.
- Fold or stack the fabric so that you have four or six layers. In my pattern I had mirrored pieces, so I folded the fabric wrong side to wrong side - like you do in clothes making - and then again in two. Then place your template on top and cut around it. I used a small cutter (it's about 30 mm in diameter), it's easier to navigate small pieces with.

- Don't forget the notches - make a small cut inside the notch, making sure it goes through all the layers
- So with only a few cuts you have a whole stack of pieces with the matching notches and you're ready to piece

- The piecing process is as usual - you place the "valley" curve on top of the "mountain" curve, match the notches and and pin two parts together (I can't as yet get rid of the pinning part, you can try if you dare)

- Then just stitch 1/4'' from the edge, if necessary you can make additional notches in the "valley" curve to help it stretch in place.
Hope it's helpful for somebody. Personally, I want to try this for mass production of my flower blocks and/or butterflies to make a bed quilt of them (a lot of them).
Linking up to Let's Bee Social at Sew Fresh Quilts


Hey, I really love the way your elephant turned out with only top/bottom borders! I don't know what the original plan was, but this seems much nicer than a 4-sided symmetry. Sometimes mistakes turn out great. :) Thank you very much for describing your process. I wouldn't have thought to make the placement notches in the templates. I seem to like making things harder on myself.. . heh!
ReplyDeleteGood tutorial on making multiples of curved pieces. Your elephant looks great, striding through the curved temple arches :)
ReplyDeleteThanks for a great reaad
ReplyDelete